
 This rocking horse design seems to be a popular pick among woodworkers.
The U-Bild plans were purchased online from Lowe’s for a thrifty $7.11, almost half the cost of any competitor.
Construction Notes:
The plans are dated, my best guess would be from the 1970’s. However, they are complete and easy to follow. A drafting friend of mine made multiple copies for me because the full-size patterns are on both sides of the paper and I wanted to create hardboard templates for future and multiple builds (I built two initially).
The project took about 20 hours (for two).
Helping Tips for your build
Leg flare pieces – The plans call for cutting and gluing small strips together to create the leg flares. With today’s equipment, I made a small jig and used a bandsaw to create a solid piece with the angled cut. I saved a lot of time doing this.
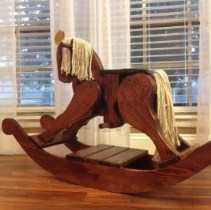
Mane and tail
Rather than yarn, I bought a cotton mop replacement head at Walmart. I liked the heavy, thicker material. I followed the plans for the mane.
For the tail, I used a short piece of one inch (inside diameter) PVC and gathered enough mop strings to fit tightly inside the pipe. I ran the strings through the pipe, leaving the last two inches exposed. After saturating the end strings with wood glue, I pulled the material just inside the pipe and let it dry to shape for two days.
Then, it was simple to pull the glued “round” out of the pipe and let it finish drying. I used my bandsaw to cut the glued portion to one inch long. With a one inch Fortsner bit, I drilled the hole for the tail and glued the tail in place. After the glue dried, it was a good, solid joint.
The Finish
I prepped the project with wood conditioner, then applied stain. I finished it off with several coats of spray-on Shellac.
Be the first to comment on "Rocking Horse"